
Product Details
Crochet Cute Critters: 26 Easy Amigurumi Patterns
Free Shipping+Easy returns

Product Details
Crochet Cute Amigurumi Patterns The Cow Sue and Santa Claus: A Fabulous Crochet Patterns with More than 75 Color Step-by-S…
Free Shipping+Easy returns

Product Details
Funky Friends Factory Melody Memory Bear Sewing Pattern
Free Shipping+Easy returns

Product Details
The Danube Swabians: German Populations in Hungary, Rumania and Yugoslavia, and Hitler’s impact on their Patterns (Studies…
Free Shipping+Easy returns

Product Details
Working Cow Horse Ranch Patterns: 100 patterns to fine tune your horsemanship
Free Shipping+Easy returns
Product Details
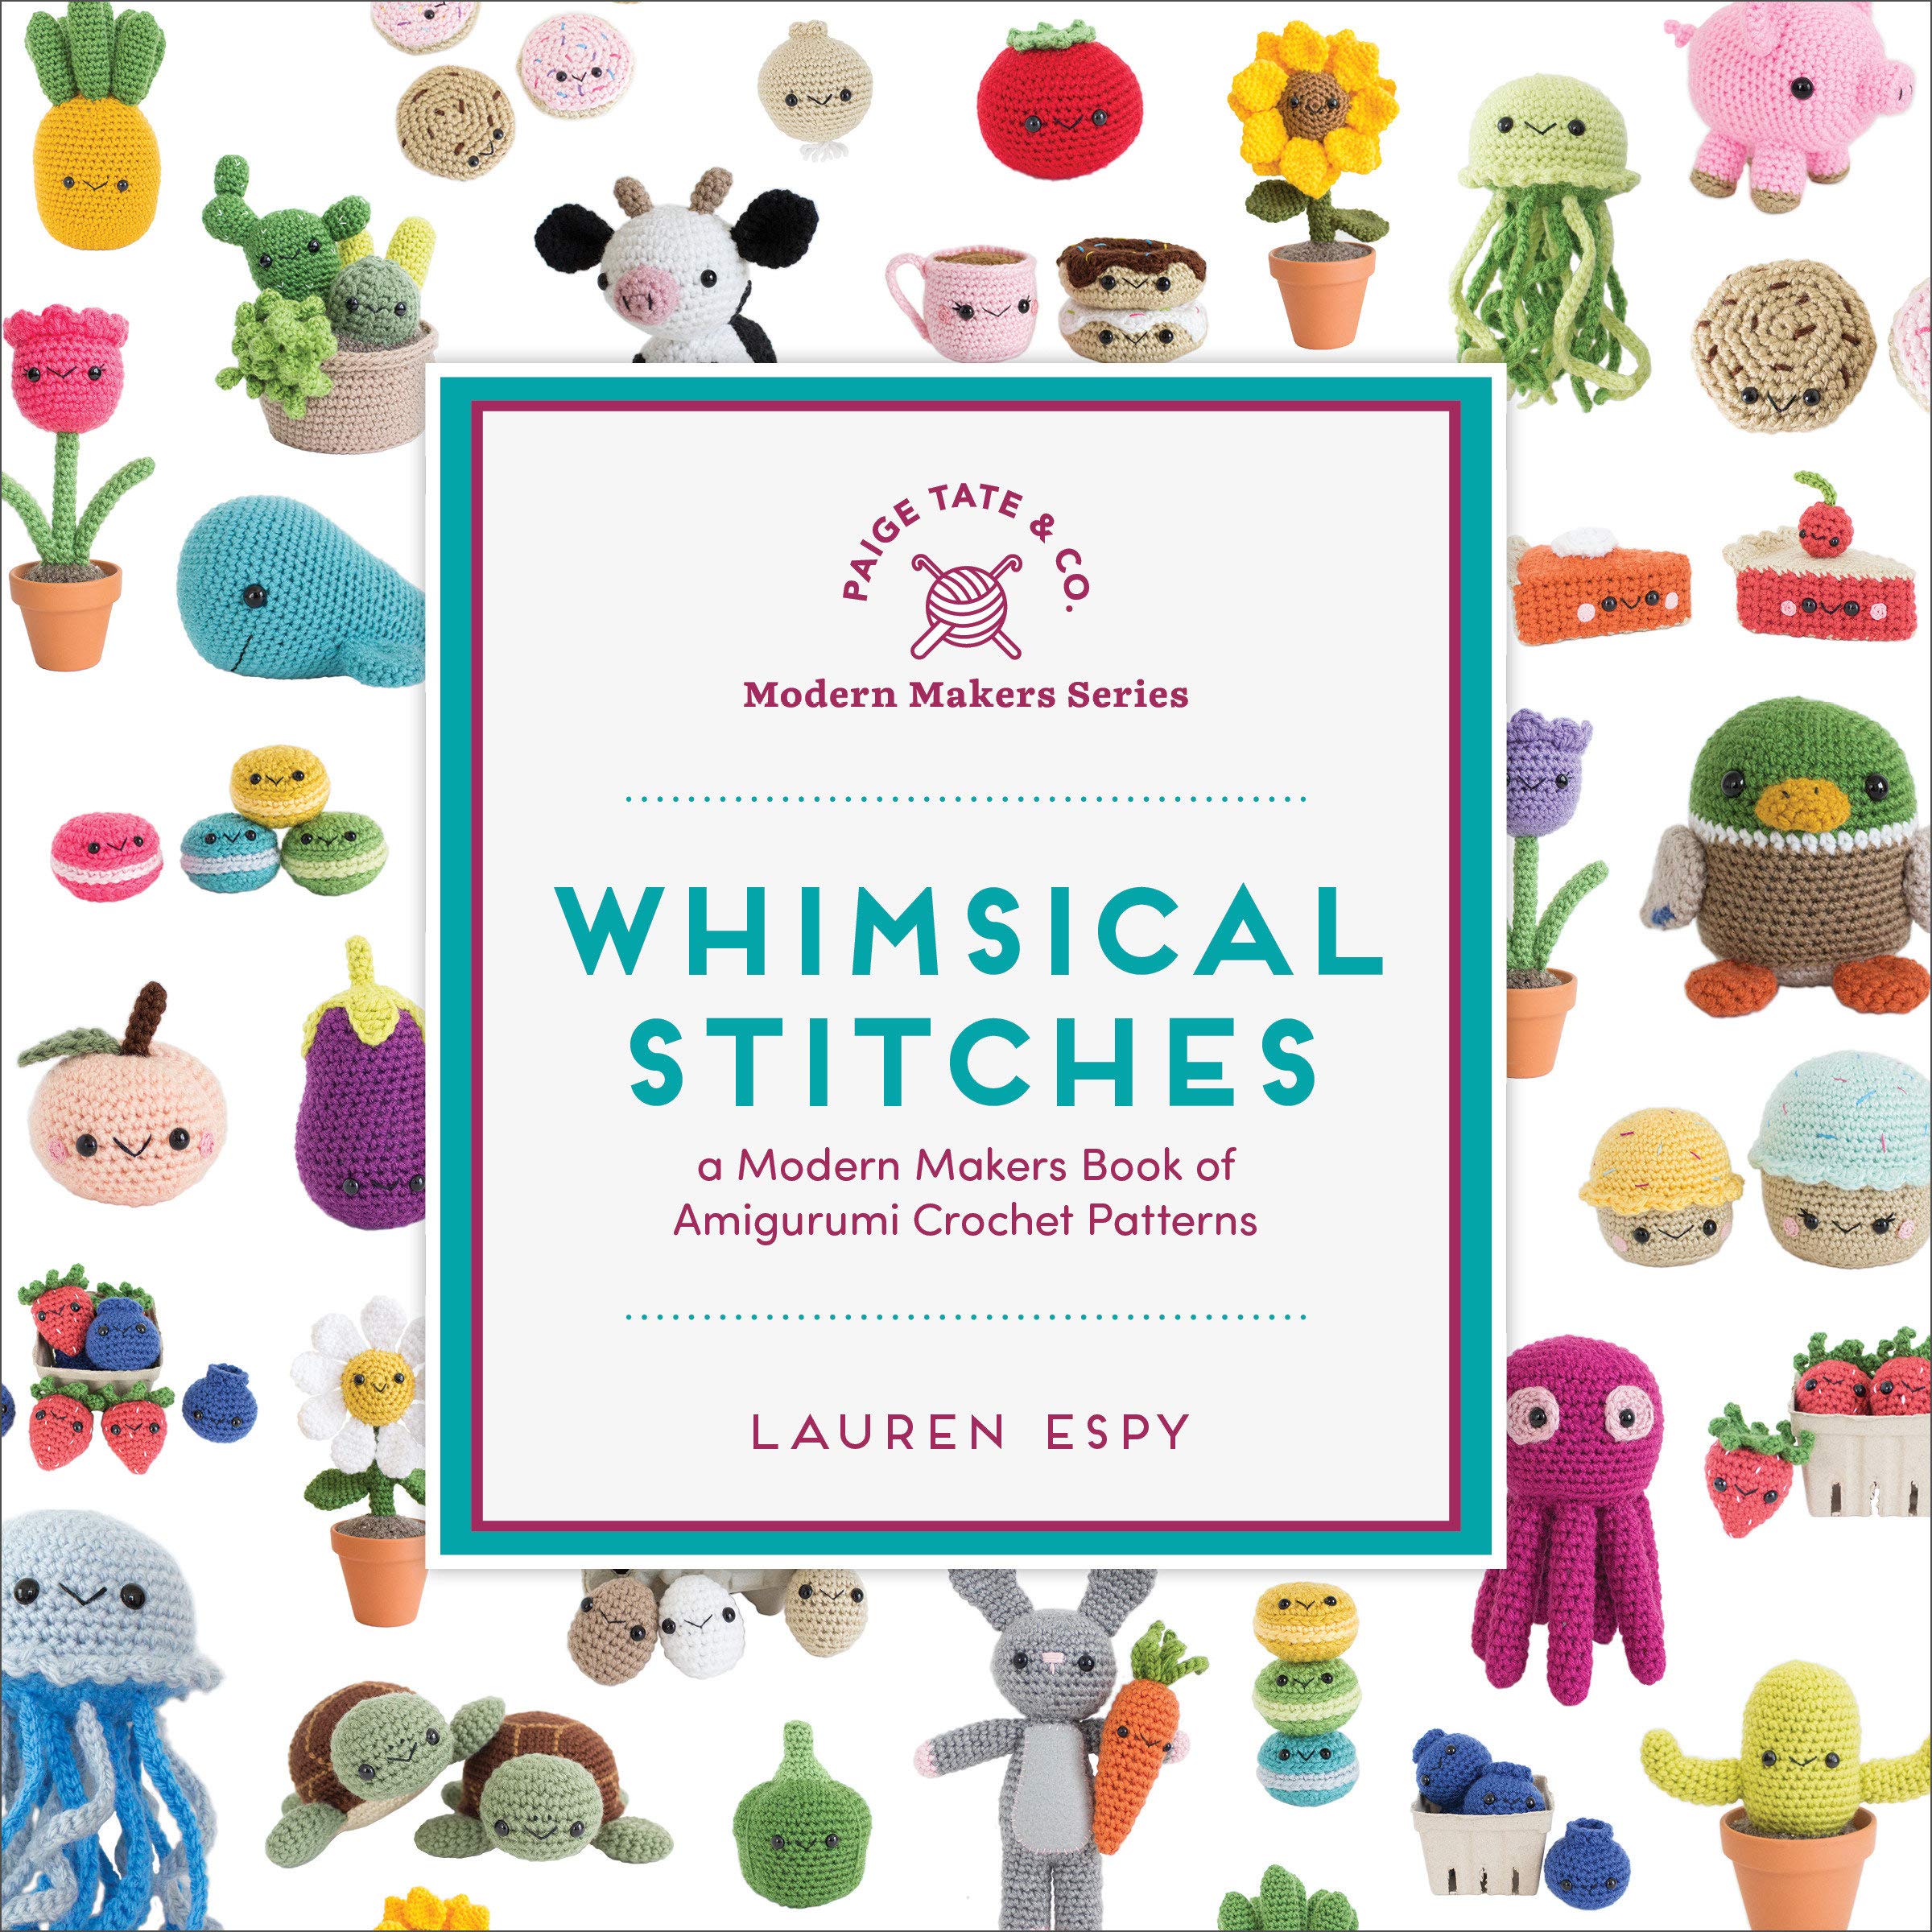
Whimsical Stitches: A Modern Makers Book of Amigurumi Crochet Patterns
Free Shipping+Easy returns

Product Details
Amigurumi Crochet Patterns For Beginners: 33 Cute & Easy Crochet Amigurumi Animals Patterns For Beginners With Step By Ste…
Free Shipping+Easy returns

Product Details
2 Pcs Cow Print Tablecloth Cow Plastic Table Cover 87 x 51 Inches Farm Animal Party Tablecovers for Cow Theme Birthday Par…
Free Shipping+Easy returns

Product Details
Pfaltzgraff Trellis White 16-Piece Dinnerware Set, Service for 4, Distressed White
Free Shipping+Easy returns

Product Details
Engineering a Better Future: Interplay between Engineering, Social Sciences, and Innovation
Free Shipping+Easy returns

Product Details
Retail Category Management: Decision Support Systems for Assortment, Shelf Space, Inventory and Price Planning (Lecture No…
Free Shipping+Easy returns
Grace and Yarn

A revised version of this pattern can be found here! Cows are one of my daughter’s favorite animals, they have officially decided that they will be farmers when they grow up! While we don’t have room in our back yard for a real one I knew they would enjoy a plushie friend in the meantime. These cows are slightly larger than most of my patterns but still work up fairly quickly at 13 inches tall. The legs and body are made as one piece with the head sewn on separately. The neck has a nice proportion to keep it sturdy for hours of play. And those spots! They may just be my favorite details along with those cute snouts! Since writing this pattern I have added a duck pattern to join them on the farm. Also added are a mini cow pattern (so you can make your own family) and a mini pig pattern! I have loved seeing all of your cows in the Grace and Yarn Crochet Group on Facebook, all the different colors and variations are so cute! I’d love to know what other farm animals you would like to see? Feel free to leave a comment in the group or message below! This post contains affiliate links, please click here for more info. Thank you for supporting Grace and Yarn! Pattern PIN this pattern to your crochet board here! Grab the ad-free PDF version in my Etsy or Ravelry shop! You can also find a discounted bundle here for both sizes! You may make and sell items made from this pattern but please do not sell, share or reproduce the actual pattern. If you sell finished items online (Etsy, etc) please provide a link to the pattern and credit to me as the designer, thank you. I hope you enjoy this pattern! Don’t want to miss any new patterns? Sign up for my newsletter and I’ll keep you updated on new patterns, tutorials and giveaways happening here on the blog! If you’re new to amigurumi be sure to check out the Tips to Learning Amigurumi page! It’s packed full of mini tutorials and helpful photos to cover all the basics! For this pattern I used plastic safety eyes, if you don’t have these on hand or prefer crocheted eyes I recommend this alternative here! Materials Size 4 worsted weight yarn (150g of white yarn; small amounts of brown or black, pink for the nose, and beige for the horns) 3.5mm crochet hook 15mm safety eyes Black crochet/embroidery thread for the eyelashes (optional) Scissors Tapestry needle (I love the bent tips!) Stuffing Stitch markers (a piece of scrap yarn works great!) Abbreviations (US Terminology) MC – Magic circle SC – Single crochet SC INC – Single crochet increase INV DEC – Invisible decrease DC – Double crochet St(s) – Stitch(es) *Slowly stuff as you go, you want it to be firm but not stretched. You will be working in the round, I like using a stitch marker at the beginning of each round.* Legs Make 2 – Starting with black or brown Round 1: Create a magic circle with 6 SC Round 2: SC INC in each st (12) Round 3: SC in the first st, SC INC in the next, rep around (18) Round 4: SC in the first 2 sts, SC INC in the next, rep around (24) Round 5: SC in the back loops only (24) Rounds 6-10: SC around (24)) Change to white Rounds 11-21: SC around (24) Fasten off on the first leg only. When you finish the 2nd leg proceed to round 22 to join the legs. Round 22: Chain 3 and attach to the first leg with a SC, SC in the remaining stitches around the leg. When you reach the chain make a SC across each of the 3 chains, SC in the remaining stitches of the next leg and SC across each of the 3 chains (you will have SC on both sides of the 3 chains now) (54) (Here’s an e
xample of a leg join from Katie the Koala pattern) This completes your join and is where your next round will start. Rounds 23-38: SC around (54) Round 39: SC in the first 7 sts, INV DEC in the next, rep around (48) Round 40: SC around (48) Round 41: SC in the first 6 sts, INV DEC in the next, rep around (42) Round 42: SC around (42) Round 43: SC in the first 5 sts, INV DEC in the next, rep around (36) Round 44: SC around (36) Round 45: SC in the first 4 sts, INV DEC in the next, rep around (30) Rounds 46-47: SC around (30) Fasten off leaving a long tail for sewing Head Round 1: Create a magic circle with 6 SC Round 2: SC INC in each st (12) Round 3: SC in the first st, SC INC in the next, rep around (18) Round 4: SC in the first 2 sts, SC INC in the next, rep around (24) Round 5: SC in the first 3 sts, SC INC in the next, rep around (30) Round 6: SC in the first 4 sts, SC INC in the next, rep around (36) Round 7: SC in the first 5 sts, SC INC in the next, rep around (42) Round 8: SC in the first 6 sts, SC INC in the next, rep around (48) Round 9: SC in the first 7 sts, SC INC in the next, rep around (54) Round 10: SC in the first 8 sts, SC INC in the next, rep around (60) Rounds 11-21: SC around (60) Here is where we will attach the safety eyes. Place them 6 stitches apart between rounds 17-19. If you would like to add eyelashes I recommend having them in place before securing the backs of your eyes. Round 22: SC in the first 8 sts, INV DEC in the next, rep around (54) Round 23: SC in the first 7 sts, INV DEC in the next, rep around (48) Round 24: SC in the first 6 sts, INV DEC in the next, rep around (42) Round 25: SC in the first 5 sts, INV DEC in the next, rep around (36) Round 26: SC in the first 4 sts, INV DEC in the next, rep around (30) Round 27: SC in the first 3 sts, INV DEC in the next, rep around (24) *Continue to stuff the head firmly* Round 28: SC in the first 2 sts, INV DEC in the next, rep around (18) Round 29: SC in the first st, INV DEC in the next, rep around (12) Round 30: INV DEC around (6) Fasten off and sew remaining part closed, weave in your end. Snout This piece is worked crocheting on both sides of a foundation chain to create an oval shape. You will want to keep your chain fairly tight to help avoid the look of ‘holes’. Ch 10 Round 1: SC in the 2nd chain from hook, SC in the next 7 chains, 3SC in the last chain. Working down the other side of your foundation chain (see picture below), SC in the next 7 chains, complete 2SC in the last chain (which is also the first chain we started with) (20) Round 2: 2SC in the first st, SC in the next 7, 2SC in each of the next 3, SC in the next 7, 2SC in each of the last 2sts (26) Round 3: 2SC in the first st, SC in the next 9, 2SC in each of the next 4 sts, SC in the next 9, 2SC in each of the last 3 sts (34) Rounds 4-7: SC around (34) Fasten off leaving a long tail for sewing Ears Make 2 with black or brown Round 1: Create a magic circle with 8 SC Rounds 2-3: SC around (8) Round 4: SC in the first st, SC INC in the next, rep around (12) Round 5: SC around (12) Round 6: SC in the first 2 sts, SC INC in the next, rep around (16) Rounds 7-13: SC around (16) Fold ear in half and SC across the top as pictured below, then fasten off leaving a long tail for sewing Horns Make 2 with beige Round 1: Create a magic circle with 9 SC Rounds 2-7: SC around (9) Fasten off leaving a long tail for sewing Assembling the Head – Sew the snout centered between the eyes stuffing as you go. – Next, sew the ears onto the head at the 6th round on each side. – Lastly, sew the horns evenly placed between the ears. Arms Make 2 stuffing lightly at the bottom and starting with black or brown Round 1: Create a magic circle with 8 SC Round 2: SC INC in each st (16) Round 3: SC in the back loops only (16) Rounds 4-7: SC around (16) Change to white Rounds 8-23: SC around (16) At the end of round 23 pinch the arms flat and SC across the top to close, fasten off leaving a long tail for sewing Spots Make 2 of each size Large Spot – Round 1: Create a magic circle with 6 SC Round 2: SC INC in each st (12) Round 3: SC in the first st, SC INC in the next, rep around (18) Round 4: SC in the first 2 sts, SC INC in the next, rep around (24) Round 5: SC in the first 3 sts, SC INC in the next, rep around (30) Round 6: SC in the first 4 sts, 2DC in each of the next 2 sts, rep around (42) Fasten off leaving a long tail for sewing Medium Spot – Round 1: Create a magic circle with 6 SC Round 2: SC INC in each st (12) Round 3: SC in the first st, SC INC in the next, rep around (18) Round 4: SC in the first 2 sts, SC INC in the next, rep around (24) Round 5: SC in the first 2 sts, 2DC in each of the next 2 sts, rep around (36) Fasten off leaving a long tail for sewing Attaching Everything Together – Sew the head onto the body, making sure to have the facial features centered. Add extra stuffing as you go to keep it firm and less wobbly. – Next, sew the arms onto the body centered with the head at round 46. – Lastly, sew a large and medium spot onto the front and back of the body. You’re sweet cow is now complete! I hope you have enjoyed making this pattern, thanks so much for stopping by!
Grace and Yarn

My daughters love themed animals and are a big inspiration to my patterns. After making my amigurumi cow, I knew I wanted to create a farm theme. The next installment is here, these sweet little ducks! (Funny enough, when I started designing them they were chicks. After frogging and trying to get the details to match what I pictured in my head, they started to look more and more like ducks. My awesome pattern testers helped me pinpoint which animal they should be!) If you are new to amigurumi be sure to check out my tips and materials page to help get you started! By including or excluding the bow and eyelashes this pattern is easily adaptable to make in a boy or girl version! Equally fun is deciding the colors to make them in. Both work up to be about 13 inches tall, perfect cuddling size! If you have any questions along the way or want to share your project with us, join the Grace and Yarn Crochet Group on Facebook! I’ll also keep you updated on new patterns, giveaways and tutorials! In most of my patterns I use plastic safety eyes, they are easy and fast to install. However, they are not recommended for children under 3. If you are making this for a little one or don’t have the size needed on hand, I recommend using my crochet thread eyes as an alternative! You may make and sell items made from this pattern but please do not sell, share or reproduce the actual pattern. If you sell finished items online (Etsy, etc) please provide a link to the pattern and credit to me as the designer, thank you. I hope you enjoy this pattern! This is a free pattern here on my blog, if you would prefer an ad-free printable version you can purchase one for a small fee from Ravelry or Etsy. Don’t forget to PIN this pattern and save to your favorite board! This post contains affiliate links, please click here for more info. Thank you for supporting Grace and Yarn! Materials: Size 4 worsted weight yarn (100g of white or yellow yarn for the body, 25g orange) 3.5 mm crochet hook (these are my favorite to use!) 15mm safety eyes Black crochet/embroidery thread for eyelashes/small amount of choice color for bow (optional) Scissors Tapestry needle (these work wonders for amigurumi with their bent tips) Stuffing (Poly-Fil and Morning Glory are my top favorites!) Stitch markers US Abbreviations: MC- Magic circle SC- Single crochet SC INC- Single crochet increase INV DEC- Invisible decrease DC- Double crochet *Slowly stuff as you go, you want it to be firm but not stretched. You will be working in the round, I like using a stitch marker at the beginning of each round. Legs and Body- Make 2: Using orange Round 1: Create a magic circle with 6 SC Round 2: SC INC in each stitch (12 SC) Round 3: SC in the first stitch, SC INC in the next stitch, repea
t around (18 SC) Round 4: SC in the first 2 stitches, SC INC in the next stitch, repeat around (24 SC) Round 5: SC in the first 3 stitches, SC INC in the next stitch, repeat around (30 SC) Round 6: SC around in the back loops only (30 SC) Rounds 7-8: SC around (30 SC) Round 9: SC in the first 9 stitches, INV DEC 6 times, SC in the last 9 stitches (24 SC) Round 10: SC in the first 6 stitches, INV DEC 6 times, SC in the last 6 stitches (18 SC) Rounds 11-22: SC around (18 SC) Fasten off (When you finish the 2nd leg do not fasten. At the end of Round 22 on the 2nd leg, complete a SC in each of the next 6 stitches, this will line up your legs to be straight when we join. Round 23 joins the legs together and starts the body.) Round 23: Chain 3 and attach to the first leg with a SC (be sure both feet are facing the same direction), SC in the remaining stitches around the leg, when you reach the chain make a SC across each of the 3 chains, SC in the remaining stitches of the next leg and SC across each of the 3 chains (42 SC) This completes your join and is where your next round will start. Round 24: SC in the first 6 stitches, SC INC in the next, repeat around (48 SC) Change to body color Round 25: SC around (48 SC) Round 26: SC in the first 7 stitches, SC INC in the next, repeat around (54 SC) Rounds 27-38: SC around (54 SC) Round 39: SC in the first 7 stitches, INV DEC in the next, repeat around (48 SC) Round 40: SC around (48 SC) Round 41: SC in the first 6 stitches, INV DEC in the next, repeat around (42 SC) Round 42: SC around (42 SC) Round 43: SC in the first 5 stitches, INV DEC in the next, repeat around (36 SC) Round 44: SC around (36 SC) Round 45: SC in the first 4 stitches, INV DEC in the next, repeat around (30 SC) Rounds 46-47: SC around (30 SC) Fasten off and leave a long tail for sewing Head- NOTE: This head will be worked from the top down, meaning the first few rounds will be the top of the head and our closing rounds at the end will be the bottom of our head. Round 1: Create a magic circle with 6 SC Round 2: SC INC in each stitch around (12 SC) Round 3: SC in the first st, SC INC in the next, repeat around (18 SC) Round 4: SC in the first 2 stitches, SC INC in the next, repeat around (24 SC) Round 5: SC in the first 3 stitches, SC INC in the next, repeat around (30 SC) Round 6: SC in the first 4 stitches, SC INC in the next, repeat around (36 SC) Round 7: SC in the first 5 stitches, SC INC in the next, repeat around (42 SC) Round 8: SC in the first 6 stitches, SC INC in the next, repeat around (48 SC) Round 9: SC in the first 7 stitches, SC INC in the next, repeat around (54 SC) Rounds 10: SC in the first 8 stitches, SC INC in the next, repeat around (60 SC) Rounds 11-20: SC around (60 SC) NOTE: Here is where we will attach the safety eyes. Place them 6 stitches apart between rounds 15-17 (If you would like eyelashes you will want to sew them on before securing your safety eyes) Round 21: SC in the first 8 stitches, INV DEC in the next, repeat around (54 SC) Round 22: SC in the first 7 stitches, INV DEC in the next, repeat around (48 SC) Round 23: SC in the first 6 stitches, INV DEC in the next, repeat around (42 SC) Round 24: SC in the first 5 stitches, INV DEC in the next, repeat around (36 SC) Round 25: SC in the first 4 stitches, INV DEC in the next, repeat around (30 SC) Round 26: SC in the first 3 stitches, INV DEC in the next, repeat around (24 SC) *Continue to stuff the head firmly Round 27: SC in the first 2 stitches, INV DEC in the next, repeat around (18 SC) Round 28: SC in the first stitch, INV DEC in the next, repeat around (12 SC) Round 29: INV DEC around (6 SC) Fasten off and sew remaining part closed, weave in your end Beak- With orange Round 1: Create a magic circle with 6 SC Round 2: SC INC in each stitch around (12 SC) Round 3: SC in the first stitch, SC INC in the next, repeat around (18 SC) Rounds 4-7: SC around (18 SC) Fasten off leaving a long tail for sewing Sew centered between the eyes, stuffing lightly. Options: you can flatten the beak to make a more rectangular bill (example on the white duck) or leave as a circle for a rounded beak (as on the yellow duck). Wings- Make 2 Round 1: Create a magic circle with 6 SC Round 2: SC INC in each stitch around (12 SC) Round 3: SC in the first stitch, SC INC in the next, repeat around (18 SC) Round 4: SC in the first 2 stitches, SC INC in the next, repeat around (24 SC) Round 5: SC in the first 3 stitches, SC INC in the next, repeat around (30 SC) Rounds 6-8: SC around (30 SC) Round 9: SC in the first 3 stitches, INV DEC in the next, repeat around (24 SC) Rounds 10-12: SC around (24 SC) Round 13: SC in the first 2 stitches, INV DEC in the next, repeat around (18 SC) Rounds 14-22: SC around (18 SC) At the end of round 22 pinch the wing flat and make 8 SC across the top to close, fasten off and leave a long tail to sew onto the body Tail- Round 1: Create a magic circle with 6 SC Round 2: SC INC in each stitch around (12 SC) Rounds 3-4: SC around (12 SC) Round 5: SC in the first stitch, SC INC in the next, repeat around (18 SC) Round 6: SC around (18 SC) Round 7: SC in the first 6 stitches, SC INC in the next 6 stitches, SC in each of the last 6 stitches (24 SC) Round 8: SC around (24 SC) Round 9: *SC in the first 6 stitches, SC INC in the next 3 stitches*, repeat from * one more time, SC in the last 6 stitches (30 SC) Round 10: SC around (30 SC) Round 11: SC in the first 6 stitches, SC INC in the next 3 stitches, SC in the next 12 stiches, SC INC in the next 3 stitches, SC in the last 6 stitches (36 SC) Fasten off leaving a long tail for sewing Attaching everything together- Sew the head onto the body, making sure to have the facial features centered. Add extra stuffing as you go to keep it firm and less wobbly. Next sew the wings onto the body centered with the head at round 46. Sew the tail centered on the back of the body, lightly stuffing as you go. Optional Bow- Working in a magic circle make 7 DCs, slip stitch, 7 DCs, and slip stitch again, pull your string tight and wrap it around the middle of the bow 4 times. Tie/secure in the back and cut your string leaving a long section to sew with. Sew onto your favorite side of the head! Your duck is complete! I hope you have enjoyed making this pattern. Let me know if you have any questions with this pattern or any of my other patterns, I would be happy to help. So, what farm animal would you like to see next in the series?
Crochet, Crafts \u0026 Cheerios {Group/Community Board}

I have been making a frenzy of octopuses…..octopuses? Is that the plural of octopus? I always call them octopi. This is a fun pattern that I worked up, and can be done with virtually any yarn…
ADD

Crochet Cow Amigurumi Free Patterns
Crochet

What are the best bovine amigurumis for you and yours to make and enjoy? These cows and bulls are the best amigurumi cow free patterns.
Amigurumi Patterns

Happy Friday friends! Earlier in the week I shared a re-release with you for our larger amigurumi cow pattern and today I’m super excited to share a revamped version of our mini cows! If you enjoyed our Mini Zebra CAL a while back you might recognize this cute and chunky mini shape. They were perfect for modifying into our sweet farm friends! The legs, body and head are made as one piece saving you t
ime on sewing. And those spots? The perfect little accent. To make these farm friends I used Lion Brand Feels Like Butta in White and Lion Brand Jeans yarn in Khaki and Stovepipe. They were the perfect combo to piece together for a little touch of squish and softness. If you’re new to amigurumi I have a few tutorials I’ll link for you down below. This is a great beginner friendly project to jump in and get your feet wet! Check out these tips below to get started! Tips to Learning Amigurumi – How To Stuff Amigurumi – Changing Colors in Amigurumi – How To Join Legs in Amigurumi Pattern PIN to save to your crochet board here! Grab the ad-free, inexpensive PDF in our Etsy or Ravelry shop Want to stay in touch? Follow Grace and Yarn for behind the scenes and sneak peeks of upcoming patterns! Pinterest – Instagram – Facebook – Newsletter Signup – Grace and Yarn Crochet Group on Facebook This post contains affiliate links, please see our disclosures for more information! Thank you for supporting Grace and Yarn! You may make and sell items made from this pattern but please do not sell, share or reproduce the actual pattern. If you sell finished items online (Etsy, etc) please provide a link to the pattern and credit to me as the designer, thank you. I hope you enjoy this pattern! Materials – Size 4 worsted weight yarn (25g of white; 25g of accent color; small amount of pink) 3.5 mm crochet hook (these are the hooks I use and love!) 12mm safety eyes Black crochet/embroidery thread for eyelashes/eyebrows/nostrils Scissors Tapestry needle (bent tip needles work wonder for amigurumi!) Stuffing Stitch markers Abbreviations – US terminology MC- Magic circle SC- Single crochet SC INC- Single crochet increase INV DEC- Invisible decrease St(s)- Stitch(es) NOTES – – Slowly stuff as you go, you want it to be firm but not stretched. You will be working in the round; I like to use a stitch marker at the beginning of each round. – The legs, body and head will be made as one piece. – Finished mini cow measures approximately 8 inches tall. Nose – With pink Round 1: Create a magic circle with 6 SC Round 2: SC INC in each st (12) Round 3: SC in the first st, SC INC in the next, rep around (18) Round 4: SC in the first 2 sts, SC INC in the next, rep around (24) Round 5: SC in the first 7 sts, SC INC in the next, rep around (27) Rounds 6-7: SC around (27) Fasten off leaving a long tail for sewing onto the head. With a small piece of black yarn and tapestry needle, make a ‘v’ for each nostril on round 4 about 3-4 sts apart. Legs – Make 2 Starting with accent color Round 1: Create a magic circle with 6 SC Round 2: SC INC in each st (12) Round 3: SC in the first st, SC INC in the next, rep around (18) Rounds 4-5: SC around (18) Change to white Rounds 6-12: SC around (18) Fasten off on the first leg only. When you complete the 2nd leg continue to round 13 to join the legs. Round 13: SC in the next 7 sts (this will align our color changes to be at the back when our join is complete). Chain 3 and attach to the first leg with a SC. SC in the remaining stitches around the leg. When you reach the chain make a SC across each of the 3 chains. SC in the remaining stitches of the next leg and SC across each of the 3 chains again. You will have crocheted on each side of the chain. (42 SC) This completes your join and is where your next round will start. Rounds 14-24: SC around (42) Round 25: SC in the first 5 sts, INV DEC in the next, rep around (36) Round 26: SC in the first 4 sts, INV DEC in the next, rep around (30) Round 27: SC around (30) Round 28: SC in the first 3 sts, INV DEC in the next, rep around (24) Round 29: SC in the first 2 sts, INV DEC in the next, rep around (18) Here is where we will start the head. Round 30: SC in the first 2 sts, SC INC in the next, rep around (24) Round 31: SC in the first 3 sts, SC INC in the next, rep around (30) Round 32: SC in the first 4 sts, SC INC in the next, rep around (36) Round 33: SC in the first 5 sts, SC INC in the next, rep around (42) Round 34: SC in the first 6 sts, SC INC in the next, rep around (48) Round 35: SC in the first 7 sts, SC INC in the next, rep around (54) Rounds 36-43: SC around (54) Round 44: SC in the first 7 sts, INV DEC in the next, rep around (48) NOTE: Here is where we will attach the facial features. Place the safety eyes 7 stitches apart between rounds 41 and 42. Add eyebrows/eyelashes to your liking before securing the backs of your safety eyes. Nose – Sew the nose centered between the eyes adding stuffing as you go. Round 45: SC in the first 6 sts, INV DEC in the next, rep around (42) Round 46: SC in the first 5 sts, INV DEC in the next, rep around (36) Round 47: SC in the first 4 sts, INV DEC in the next, rep around (30) Round 48: SC in the first 3 sts, INV DEC in the next, rep around (24) *Continue to stuff the head and neck firmly to avoid a wobbly head* Round 49: SC in the first 2 sts, INV DEC in the next, rep around (18) Round 50: SC in the first st, INV DEC in the next, rep around (12) Round 51: INV DEC around (6) Fasten off and sew remaining hole closed, weave in your end. Ears- Make 2 With body color Round 1: Create a magic circle with 7 SC Rounds 2-3: SC around (7) Round 4: SC INC in each st around (14) Rounds 5-11: SC around (14) Fasten off leaving a long tail for sewing, fold ear in half and SC across to close the ear as pictured. Arms- Make 2 stuffing lightly at the bottom With accent color Round 1: Create a magic circle with 6 SC Round 2: SC INC in each stitch around (12) Round 3: SC in the first 3 sts, SC INC in the next, rep around (15) Round 4: SC around (15) Round 5: SC in the first stitch, INV DEC in the next, rep around (10) Change to white Rounds 6-14: SC around (10) At the end of round 14 pinch the arm flat and make 5 SC across the top to close, fasten off and leave a long tail to sew onto the body. Horns – With accent color Round 1: Create a magic circle with 6 SC Round 2: SC INC in each stitch around (12) Round 3: SC in the first 3 sts, SC INC in the next, rep around (15) Round 4: SC around (15) Round 5: SC in the first stitch, INV DEC in the next, rep around (10) Round 6: SC around (10) Fasten off leaving a long tail for sewing. Spots – Make 2 of each size Large Spot – With accent color Round 1: Create a magic circle with 6 SC Round 2: SC INC in each st (12) Round 3: SC in the first st, SC INC in the next, rep around (18) Round 4: 2DC in the first 2 sts, sl st in the next, rep around (30) Fasten off leaving a long tail for sewing. Small Spot – With accent color Round 1: Create a magic circle with 6 SC Round 2: SC INC in each st (12) Round 3: 2DC in the first st, sl st in the next, rep around (18) Fasten off leaving a long tail for sewing. Assembly – – Sew the ears onto the head at the 6th round on each side. – Next, sew the horns evenly placed between the ears stuffing as you go. – Sew the arms onto the body centered with the head at round 27. – Sew a large and medium spot onto the front and back of the body. – Lastly, cut 3 strands of your accent color and 1 strand of white approximately 8 inches long to make the tail. Using your crochet hook, pull the strands through a center stitch on the back of your cow and braid to your desired length. Secure with a knot and trim as needed. Your mini cow is complete! I hope you have enjoyed making this pattern. Thanks so much for stopping by!
Granny’s Square

How cute is this cow crochet pattern? I can’t believe it’s free!